> ## Documentation Index
> Fetch the complete documentation index at: https://guides.seenmarkets.com/llms.txt
> Use this file to discover all available pages before exploring further.
# Quickstart
> Launch your market in under 5 minutes
## Create Your Account
Create your free account at [seenmarkets.com/signup](https://seenmarkets.com/signup) or download the **Seen Markets mobile app** (iOS / Android). You can also sign in with Google or Apple.
After creating your account, you'll set up your **organization** — this is your central hub for managing all your markets, team members, and settings.
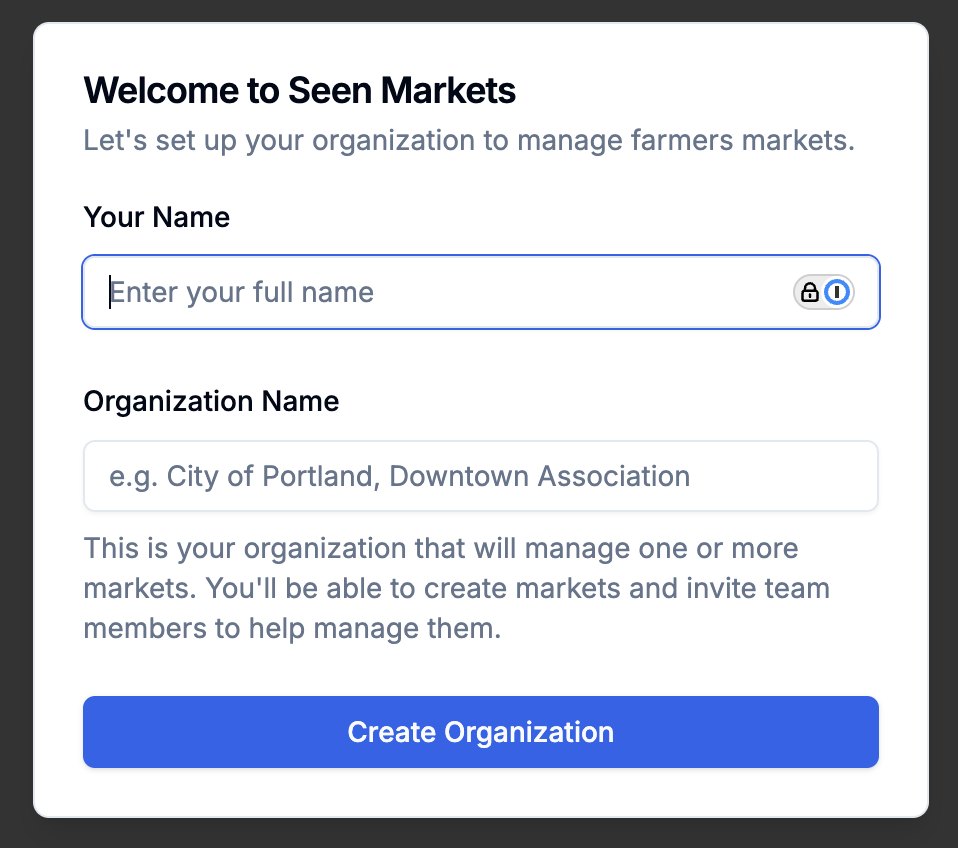 Sign in at [seenmarkets.com/signin](https://seenmarkets.com/signin) or in the mobile app to continue managing your markets.
## Pricing
Your **first event is free**. To create unlimited events, upgrade to **Pro**:
* **Mobile app:** Subscribe via Apple (App Store) or Google Play.
* **Web:** Subscribe via Stripe at [seenmarkets.com](https://seenmarkets.com).
Vendors don't need a subscription — vendor features are always free.
## Creating Your First Market
On the web: click **Create Market** at the top of your dashboard.
In the app: tap the **+ Add** button on the Schedule tab.
* **Market Name** — the official name of your event.
* **Description** — a brief overview shown to vendors and shoppers.
* **Address Information** — the physical location.
* **Contact Information** — name, phone, email (visible to vendors and shoppers who need to reach you).
* **Start Date and Time** — when the market begins.
* **End Date and Time** — when the market ends.
* **Timezone** — your market's timezone.
* **Is Recurring?** — mark if this is a recurring market (you'll add more dates later by duplicating).
* **Has Admission Fee?** — if shoppers pay to attend, set the amount. This is for display only; booth fees for vendors are handled separately via payments.
Add your Instagram, TikTok, X, Facebook, YouTube, custom links, and FAQs. These appear on the market page and Digital Market Guide.
Review everything and click **Create Market**.
## After Creating Your Market
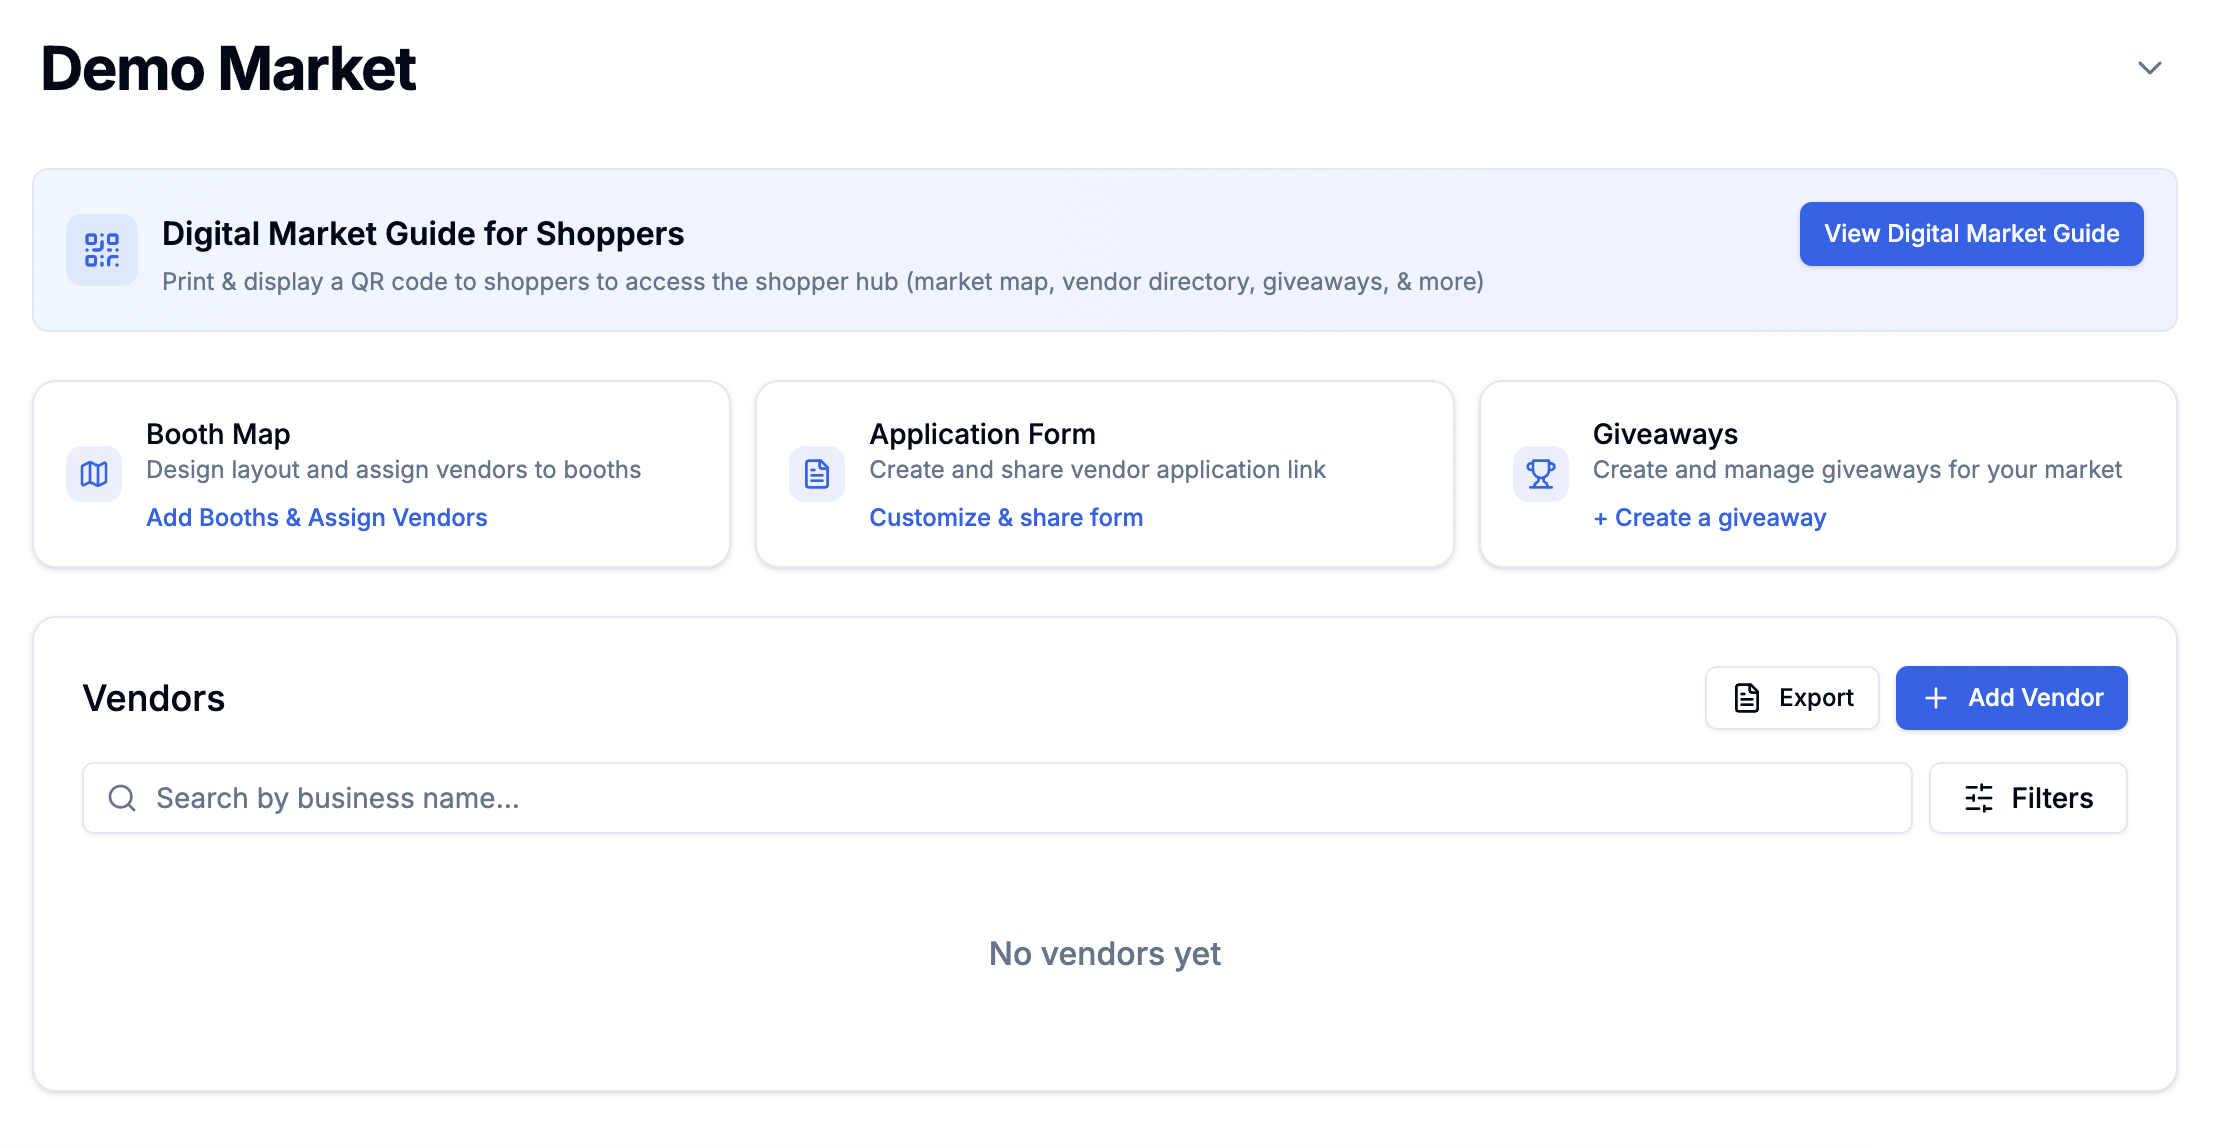
You'll be directed to your markets list. Click **Manage** to open the market management page — your central hub for everything related to this event.
Sign in at [seenmarkets.com/signin](https://seenmarkets.com/signin) or in the mobile app to continue managing your markets.
## Pricing
Your **first event is free**. To create unlimited events, upgrade to **Pro**:
* **Mobile app:** Subscribe via Apple (App Store) or Google Play.
* **Web:** Subscribe via Stripe at [seenmarkets.com](https://seenmarkets.com).
Vendors don't need a subscription — vendor features are always free.
## Creating Your First Market
On the web: click **Create Market** at the top of your dashboard.
In the app: tap the **+ Add** button on the Schedule tab.
* **Market Name** — the official name of your event.
* **Description** — a brief overview shown to vendors and shoppers.
* **Address Information** — the physical location.
* **Contact Information** — name, phone, email (visible to vendors and shoppers who need to reach you).
* **Start Date and Time** — when the market begins.
* **End Date and Time** — when the market ends.
* **Timezone** — your market's timezone.
* **Is Recurring?** — mark if this is a recurring market (you'll add more dates later by duplicating).
* **Has Admission Fee?** — if shoppers pay to attend, set the amount. This is for display only; booth fees for vendors are handled separately via payments.
Add your Instagram, TikTok, X, Facebook, YouTube, custom links, and FAQs. These appear on the market page and Digital Market Guide.
Review everything and click **Create Market**.
## After Creating Your Market
You'll be directed to your markets list. Click **Manage** to open the market management page — your central hub for everything related to this event.
 ## What to Set Up Next
### 1. Set Up Payments
Connect Stripe to collect booth fees and application fees from vendors. Go to **Settings → Payments** or use the getting started checklist in the mobile app.
* We charge a 2% processing fee on top of Stripe's standard fees (0% on Pro Plus and Pro Concierge plans).
* You can optionally pass the platform fee to vendors.
Full details: [Payment Processing](/essentials/payment-processing) | [How to collect payments](/how-to/collect-payments)
### 2. Customize Your Application Form
Open the **Application Form** from the market management page. Add custom questions, set a deadline, configure auto-waitlist, and add terms & conditions. Then share the application link with vendors.
Full details: [Vendor Application Form](/essentials/vendor-applications)
### 3. Design Your Booth Map
Open the **Booth Map** to design your layout. Add booths, landmarks, upload a background image (venue floor plan), and optionally set booth prices and enable vendor self-selection.
Full details: [Booth Map Designer](/essentials/booth-map) | [How to edit my event map](/how-to/edit-event-map)
### 4. Share Your Links
From the market management page (or the mobile app), share:
* **Application Form** — the direct link vendors use to apply. → [How to share my market](/how-to/share-market)
* **Market Page** — a public marketing page with vendor list, application link, and details.
* **Digital Market Guide** — what shoppers use at the market (booth map, giveaways, community signup). Download the QR code for signage. → [Digital Market Guide](/essentials/digital-market-guide)
### 5. Share Your Schedule Page
Your organization has a **public schedule page** listing all your upcoming events. Share this link so vendors and shoppers can see your full calendar and apply to any event.
Full details: [How to add my schedule to my website](/how-to/add-schedule-to-website)
### 6. Set Up a Giveaway (optional)
Create a giveaway to engage shoppers at the event — vendor-sponsored prizes with social follow requirements and automated winner selection.
Full details: [How to set up a giveaway](/how-to/set-up-giveaway) | [Giveaways](/essentials/giveaways)
### 7. Add Team Members (optional)
Invite people to help manage your markets. Team members can access everything in your organization.
Full details: [How to add team members](/how-to/add-team-members)
### 8. Set Up Email Integrations (optional)
Sync your vendor and shopper lists to **Flodesk** or **Mailchimp** for email marketing.
Full details: [Email Integrations](/essentials/email-integrations)
### 9. Message Your Vendors
Once vendors start applying, you can send market-wide announcements or DM individual vendors directly.
Full details: [How to message vendors](/how-to/message-vendors) | [Send Updates](/essentials/send-update)
## Adding Recurring Dates
If you run a weekly, monthly, or seasonal market:
1. Create your first event for the first date.
2. Use **Add another date** (duplicate) to create the next date — copies the application form, booth map, vendors, and settings.
3. Each date is its own event so you manage them separately.
4. Vendors apply to one date, then can quickly apply to your other dates from their portal with prefilled info.
Full details: [Setup your event with recurring dates](/recurring-dates)
## Using the Mobile App
The Seen Markets mobile app lets you create events, add recurring dates, message vendors, share links, and manage on the go. Detailed setup (booth map design, application form editing, vendor table) is easier on the web.
Full details: [Mobile App](/mobile-app) | [Mobile app for hosts](/mobile-app/hosts) | [Mobile app for vendors](/mobile-app/vendors)
## All Guides and Tutorials
Watch how the entire platform works for hosts and vendors
Set up Stripe, collect booth fees, manage payments
Customize your form, set deadlines, configure auto-waitlist
Design your layout, set booth prices, enable vendor self-selection
Review applications, manage vendors, DMs, payments, notes
Interactive shopper experience with booth map, giveaways, and community signup
Create giveaways to engage shoppers and build your community
Send announcements and DM vendors
All automated emails sent by Seen Markets
Sync vendors and shoppers to Flodesk or Mailchimp
Order professional signage, labels, banners, and more
What vendors see and how they manage their participation
Need help getting started? Contact us at
[team@seenmarkets.com](mailto:team@seenmarkets.com)
## What to Set Up Next
### 1. Set Up Payments
Connect Stripe to collect booth fees and application fees from vendors. Go to **Settings → Payments** or use the getting started checklist in the mobile app.
* We charge a 2% processing fee on top of Stripe's standard fees (0% on Pro Plus and Pro Concierge plans).
* You can optionally pass the platform fee to vendors.
Full details: [Payment Processing](/essentials/payment-processing) | [How to collect payments](/how-to/collect-payments)
### 2. Customize Your Application Form
Open the **Application Form** from the market management page. Add custom questions, set a deadline, configure auto-waitlist, and add terms & conditions. Then share the application link with vendors.
Full details: [Vendor Application Form](/essentials/vendor-applications)
### 3. Design Your Booth Map
Open the **Booth Map** to design your layout. Add booths, landmarks, upload a background image (venue floor plan), and optionally set booth prices and enable vendor self-selection.
Full details: [Booth Map Designer](/essentials/booth-map) | [How to edit my event map](/how-to/edit-event-map)
### 4. Share Your Links
From the market management page (or the mobile app), share:
* **Application Form** — the direct link vendors use to apply. → [How to share my market](/how-to/share-market)
* **Market Page** — a public marketing page with vendor list, application link, and details.
* **Digital Market Guide** — what shoppers use at the market (booth map, giveaways, community signup). Download the QR code for signage. → [Digital Market Guide](/essentials/digital-market-guide)
### 5. Share Your Schedule Page
Your organization has a **public schedule page** listing all your upcoming events. Share this link so vendors and shoppers can see your full calendar and apply to any event.
Full details: [How to add my schedule to my website](/how-to/add-schedule-to-website)
### 6. Set Up a Giveaway (optional)
Create a giveaway to engage shoppers at the event — vendor-sponsored prizes with social follow requirements and automated winner selection.
Full details: [How to set up a giveaway](/how-to/set-up-giveaway) | [Giveaways](/essentials/giveaways)
### 7. Add Team Members (optional)
Invite people to help manage your markets. Team members can access everything in your organization.
Full details: [How to add team members](/how-to/add-team-members)
### 8. Set Up Email Integrations (optional)
Sync your vendor and shopper lists to **Flodesk** or **Mailchimp** for email marketing.
Full details: [Email Integrations](/essentials/email-integrations)
### 9. Message Your Vendors
Once vendors start applying, you can send market-wide announcements or DM individual vendors directly.
Full details: [How to message vendors](/how-to/message-vendors) | [Send Updates](/essentials/send-update)
## Adding Recurring Dates
If you run a weekly, monthly, or seasonal market:
1. Create your first event for the first date.
2. Use **Add another date** (duplicate) to create the next date — copies the application form, booth map, vendors, and settings.
3. Each date is its own event so you manage them separately.
4. Vendors apply to one date, then can quickly apply to your other dates from their portal with prefilled info.
Full details: [Setup your event with recurring dates](/recurring-dates)
## Using the Mobile App
The Seen Markets mobile app lets you create events, add recurring dates, message vendors, share links, and manage on the go. Detailed setup (booth map design, application form editing, vendor table) is easier on the web.
Full details: [Mobile App](/mobile-app) | [Mobile app for hosts](/mobile-app/hosts) | [Mobile app for vendors](/mobile-app/vendors)
## All Guides and Tutorials
Watch how the entire platform works for hosts and vendors
Set up Stripe, collect booth fees, manage payments
Customize your form, set deadlines, configure auto-waitlist
Design your layout, set booth prices, enable vendor self-selection
Review applications, manage vendors, DMs, payments, notes
Interactive shopper experience with booth map, giveaways, and community signup
Create giveaways to engage shoppers and build your community
Send announcements and DM vendors
All automated emails sent by Seen Markets
Sync vendors and shoppers to Flodesk or Mailchimp
Order professional signage, labels, banners, and more
What vendors see and how they manage their participation
Need help getting started? Contact us at
[team@seenmarkets.com](mailto:team@seenmarkets.com)