> ## Documentation Index
> Fetch the complete documentation index at: https://guides.seenmarkets.com/llms.txt
> Use this file to discover all available pages before exploring further.
# Vendor Application Form
> Streamline your vendor application and approval process
## Overview
Every market includes a vendor application form with standard questions pre-configured. You customize it by editing inline — click on any yellow-highlighted section to add your own questions, update instructions, configure settings, and more. Vendors apply through a shareable link and their submissions appear in your vendor management table.
## Accessing the Application Form
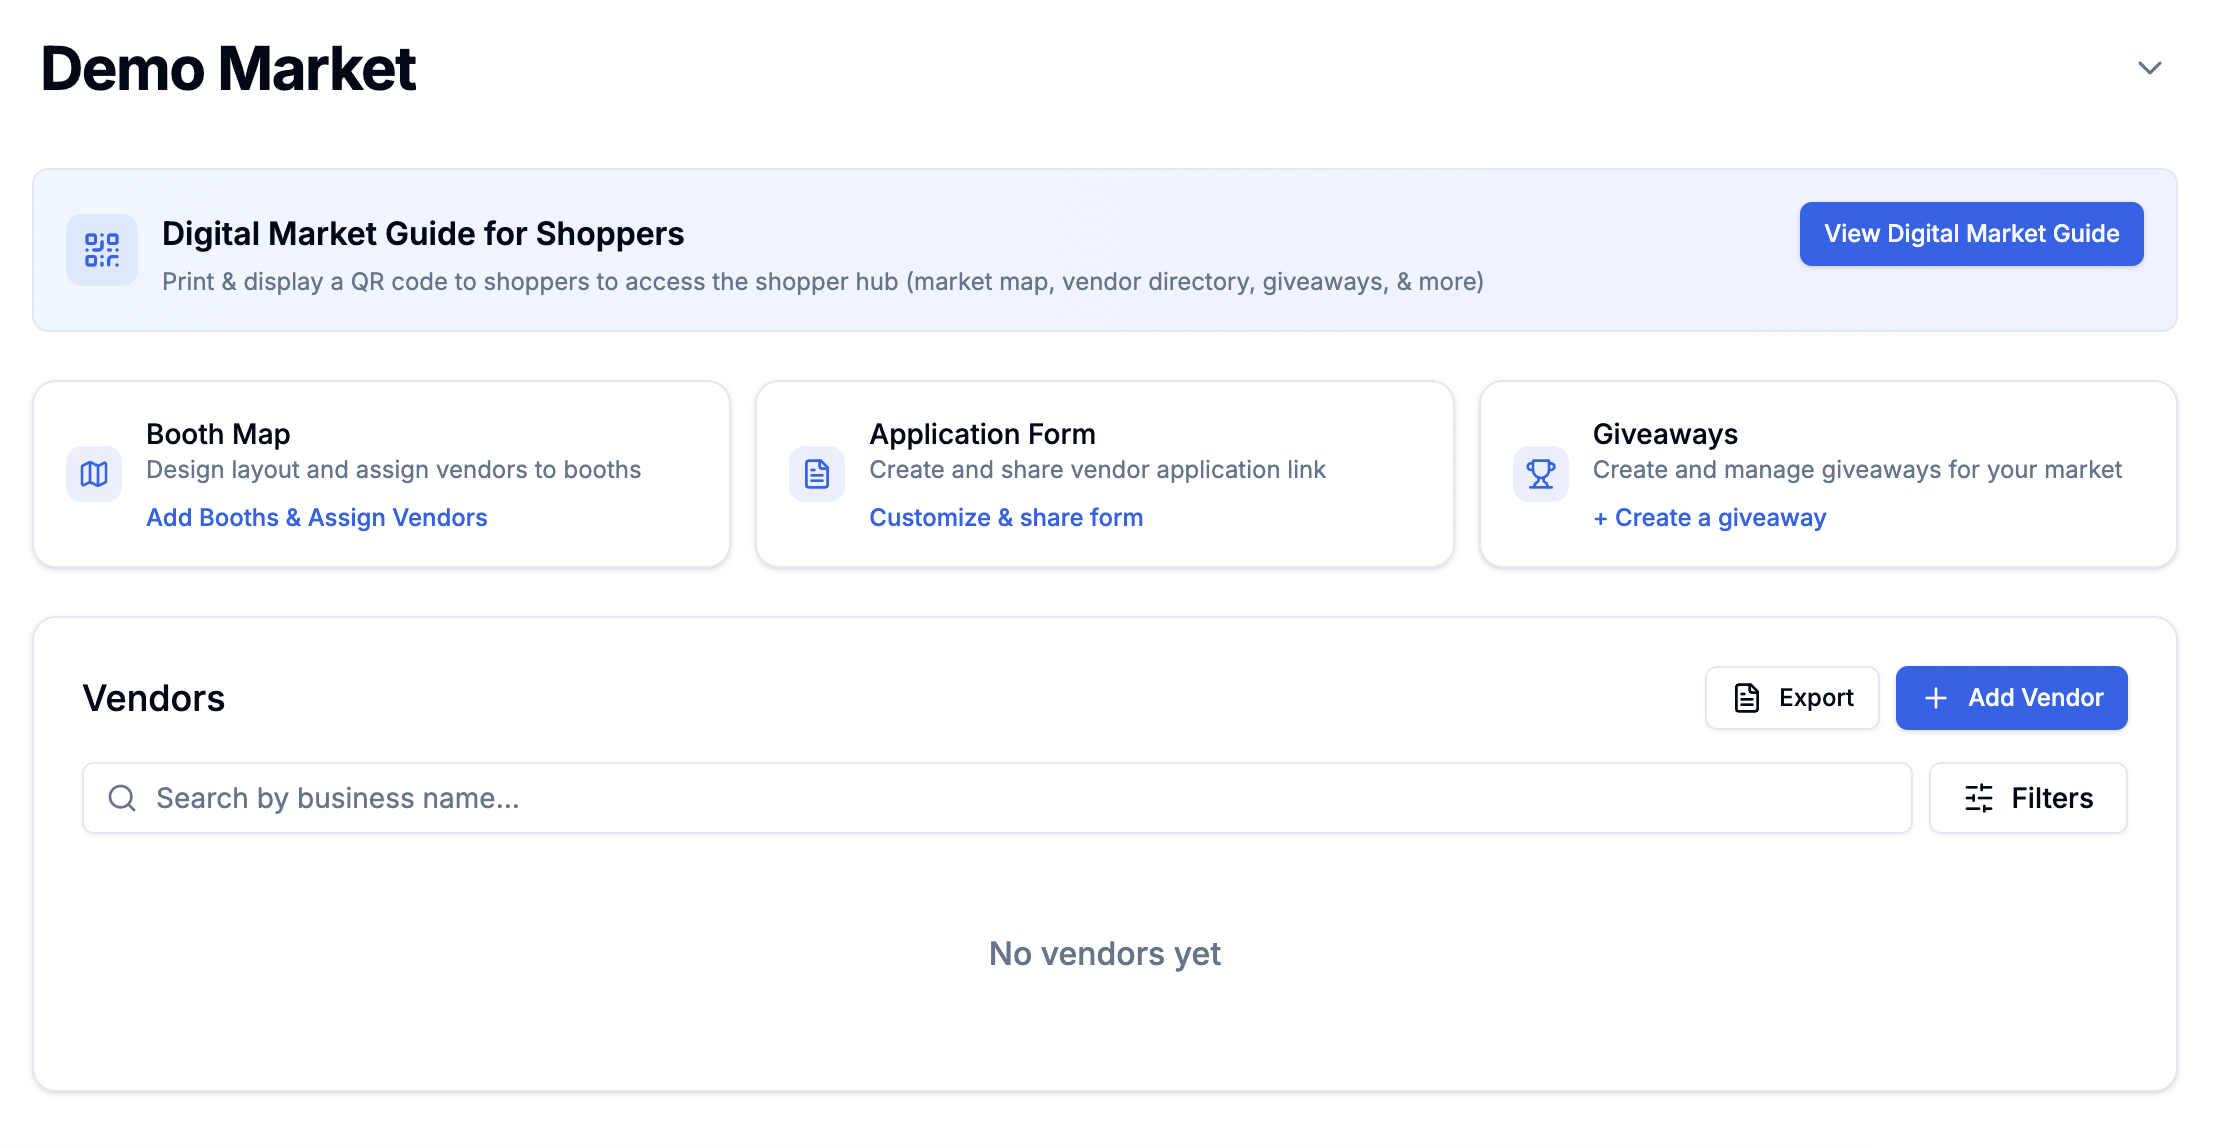
Open your market's management page and click the **Application Form** card. This opens a full-screen editor that shows your form exactly as vendors will see it, with yellow edit controls overlaid on each customizable section.
 ## How the Form Editor Works
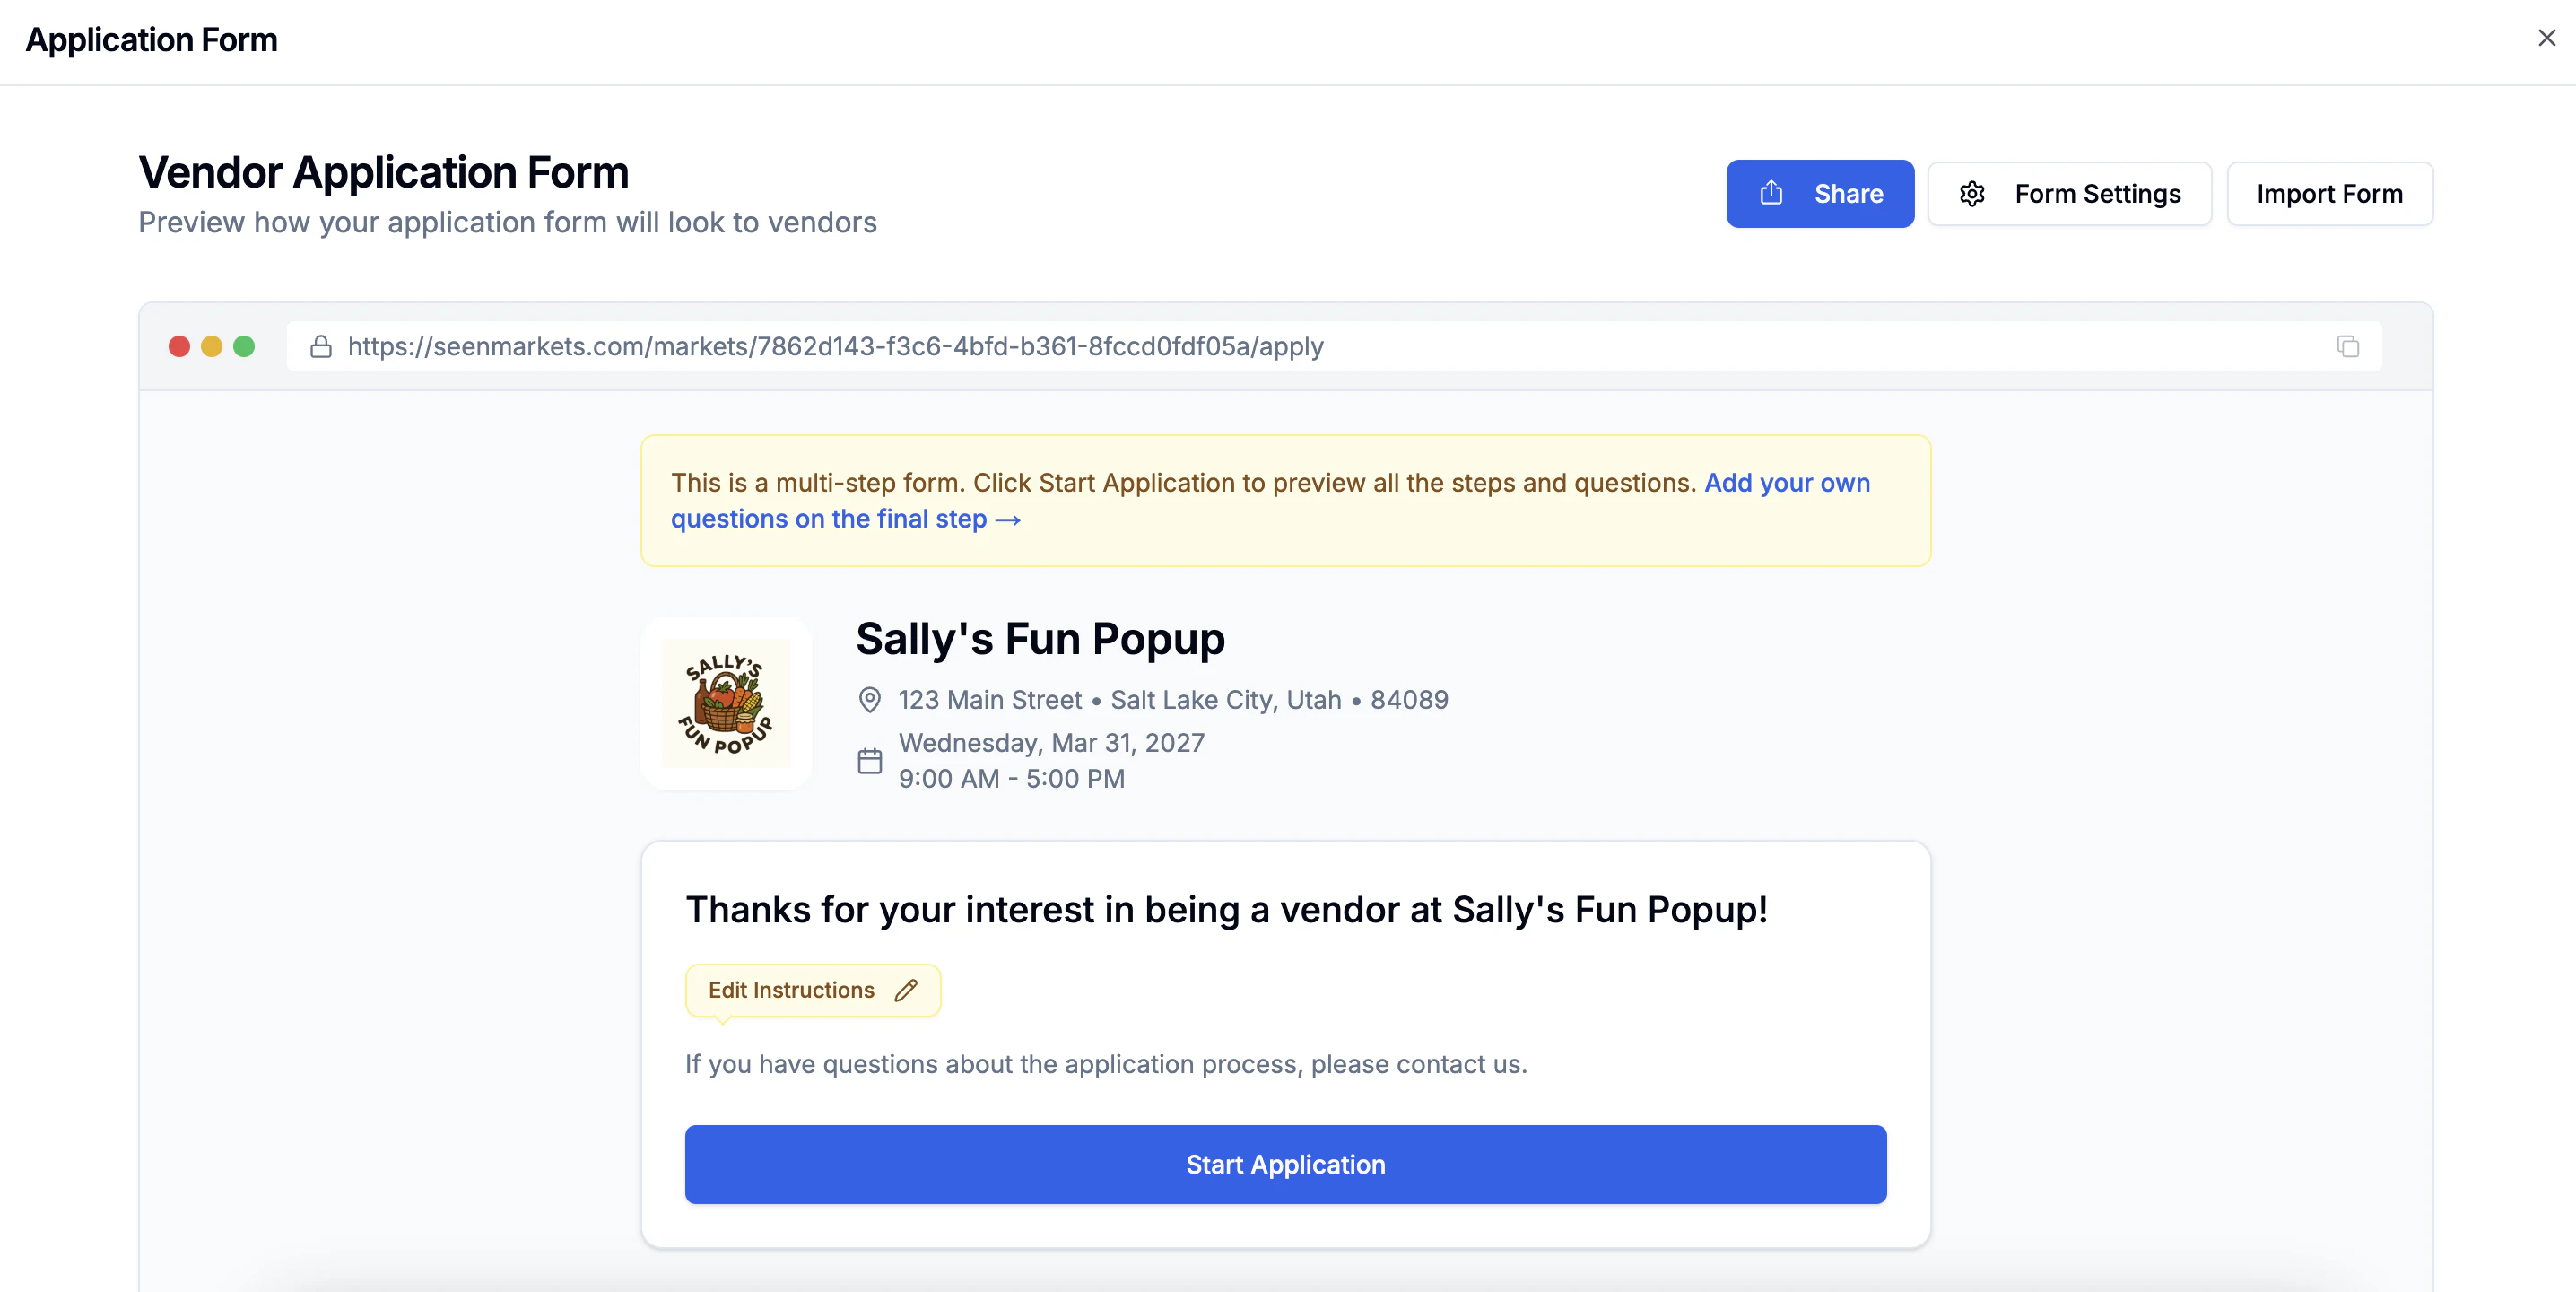
The editor is a **live preview of your application form**. There's no separate edit mode — you see the form as vendors see it, but with yellow-highlighted areas that you can click to customize. At the top you'll find:
* **Share** — copy the application URL or share it.
* **Form Settings** — set deadlines and waitlist rules.
* **Import Form** — copy questions and settings from another market.
* **URL bar** — shows the public application URL; click to copy.
The form preview walks through the same steps vendors see:
1. **Instructions page** — your market info and instructions, with a "Start Application" button.
2. **Name and email** — standard fields (not editable).
3. **Full form** — all standard fields, your custom questions, product categories, giveaway, tax ID, and terms. Yellow controls appear next to each customizable section.
Standard questions (business name, contact info, description, etc.) are
included automatically and cannot be removed. They ensure you collect
essential vendor information every time.
## Customizing Your Form
### Instructions
At the top of the form, you'll see a yellow **"Edit Instructions"** badge with a pencil icon. Click it to write or update the instructions vendors see before they start the application:
* Market details and rules
* Vendor requirements
* Booth fees and what's included
* Important dates
* Setup and teardown instructions
Click **Save** when you're done. Vendors see this on the first page of the application.
## How the Form Editor Works
The editor is a **live preview of your application form**. There's no separate edit mode — you see the form as vendors see it, but with yellow-highlighted areas that you can click to customize. At the top you'll find:
* **Share** — copy the application URL or share it.
* **Form Settings** — set deadlines and waitlist rules.
* **Import Form** — copy questions and settings from another market.
* **URL bar** — shows the public application URL; click to copy.
The form preview walks through the same steps vendors see:
1. **Instructions page** — your market info and instructions, with a "Start Application" button.
2. **Name and email** — standard fields (not editable).
3. **Full form** — all standard fields, your custom questions, product categories, giveaway, tax ID, and terms. Yellow controls appear next to each customizable section.
Standard questions (business name, contact info, description, etc.) are
included automatically and cannot be removed. They ensure you collect
essential vendor information every time.
## Customizing Your Form
### Instructions
At the top of the form, you'll see a yellow **"Edit Instructions"** badge with a pencil icon. Click it to write or update the instructions vendors see before they start the application:
* Market details and rules
* Vendor requirements
* Booth fees and what's included
* Important dates
* Setup and teardown instructions
Click **Save** when you're done. Vendors see this on the first page of the application.
 ### Custom Questions
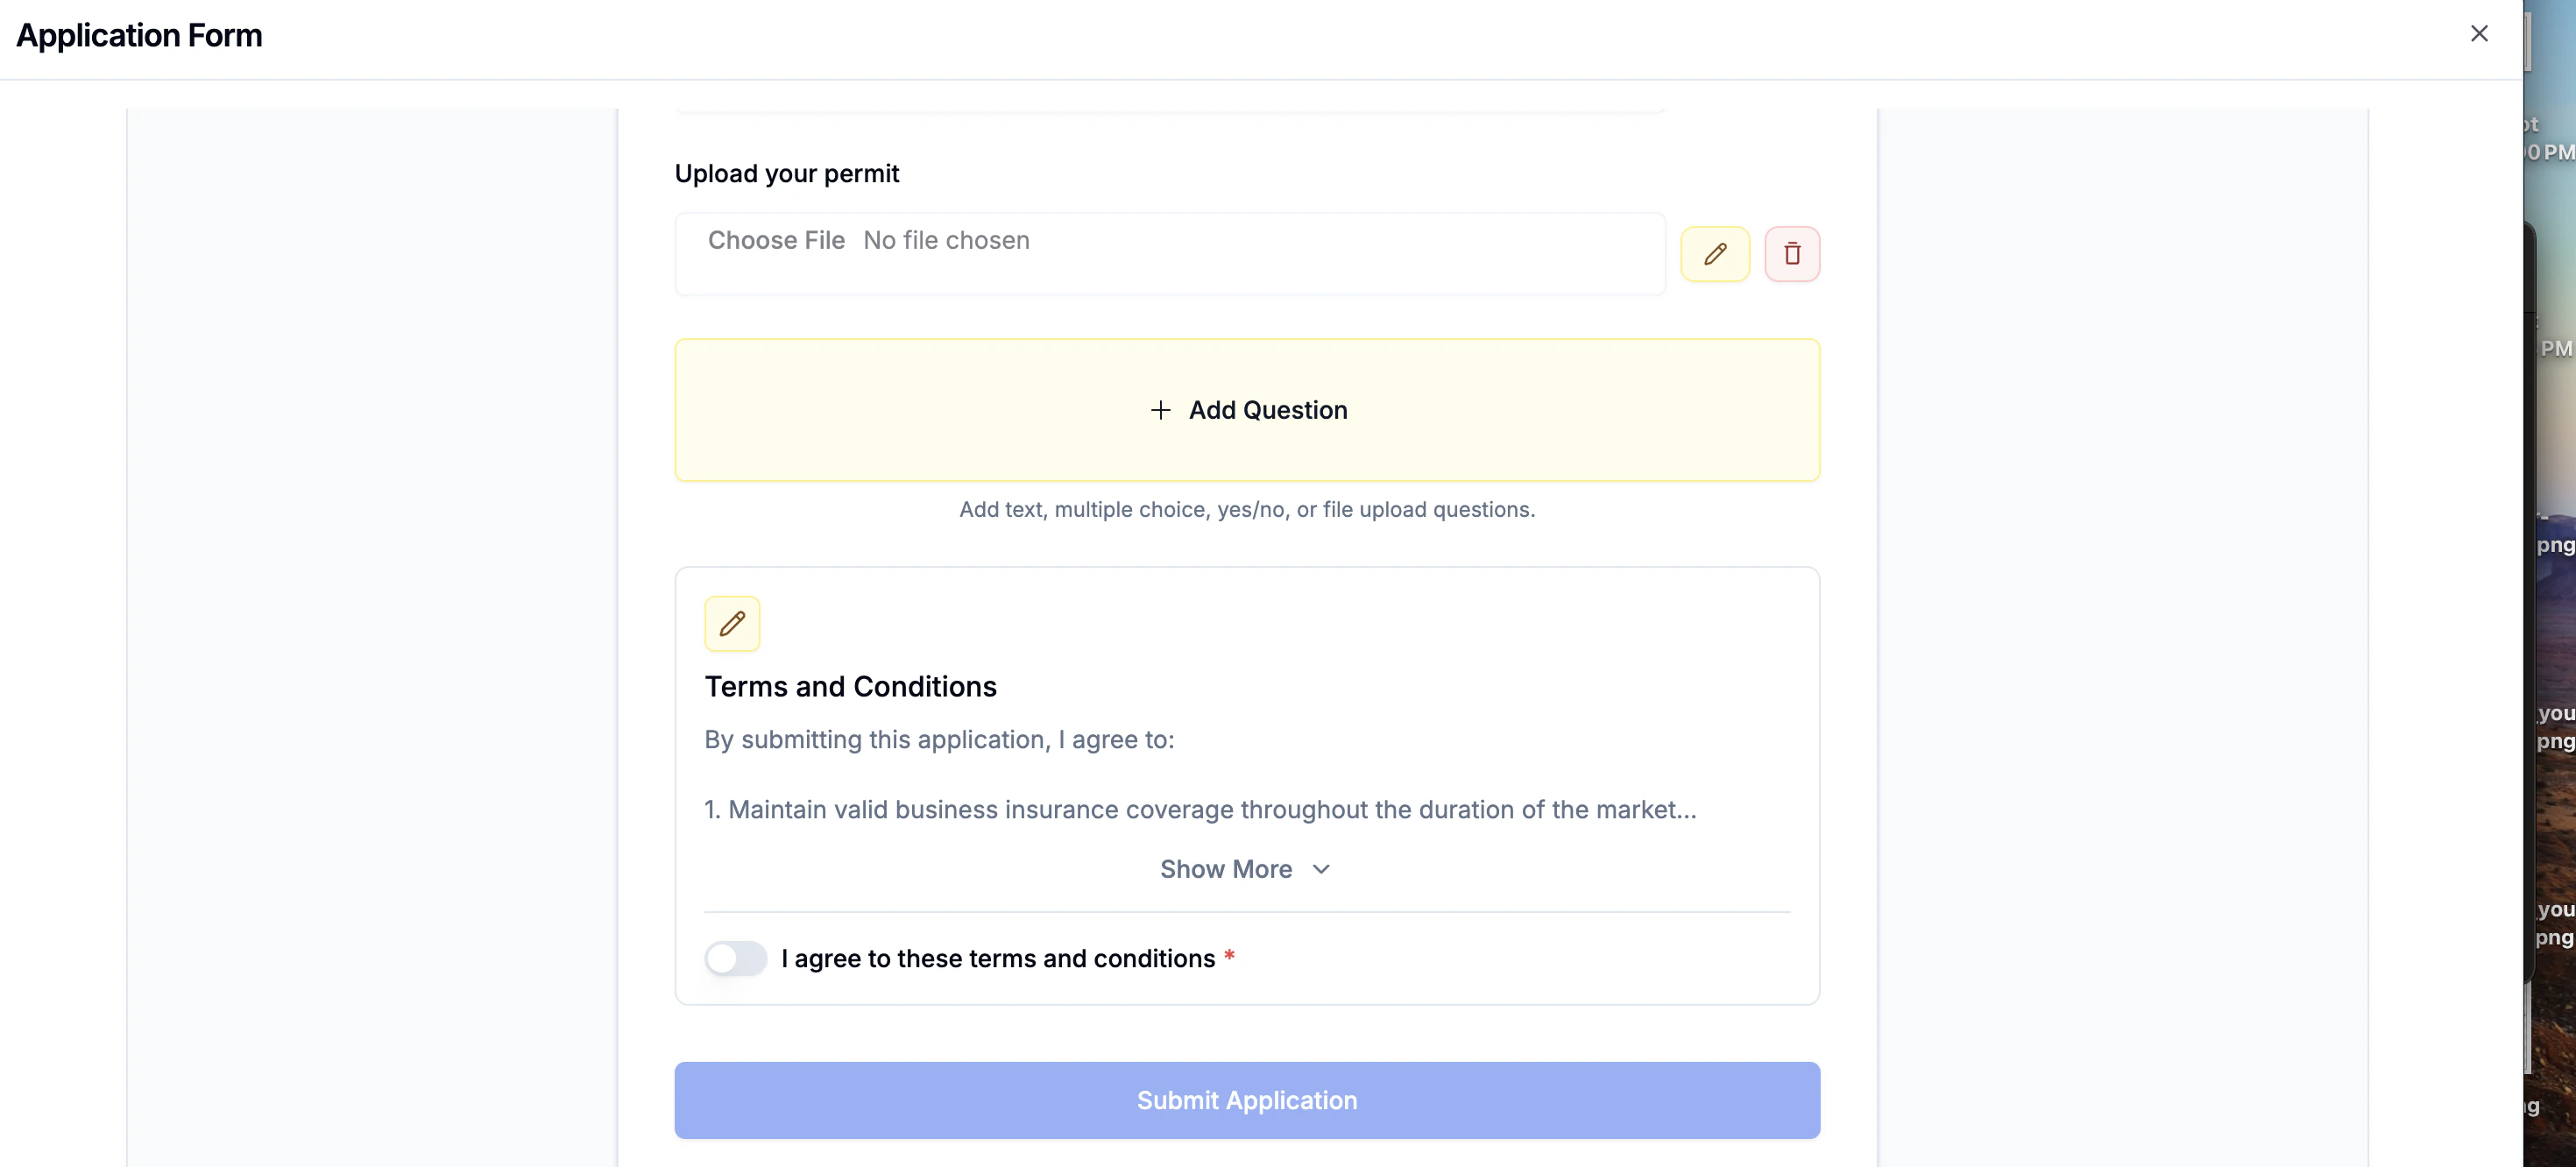
On the form step, you'll see a yellow **"Add Question"** button at the bottom of the questions section. Click it to add your own questions. Question types:
* **Text** — free-form written response.
* **Select** — dropdown with predefined options.
* **Checkbox** — yes/no or multiple selection.
* **File** — vendor uploads a document or image (e.g. insurance certificate, product photos).
Each custom question you've added has two icons next to it:
* **Yellow pencil** — click to edit the question inline (text, type, options, required, description). The question expands into an inline editor with a yellow border.
* **Red trash** — click to delete the question.
### Custom Questions
On the form step, you'll see a yellow **"Add Question"** button at the bottom of the questions section. Click it to add your own questions. Question types:
* **Text** — free-form written response.
* **Select** — dropdown with predefined options.
* **Checkbox** — yes/no or multiple selection.
* **File** — vendor uploads a document or image (e.g. insurance certificate, product photos).
Each custom question you've added has two icons next to it:
* **Yellow pencil** — click to edit the question inline (text, type, options, required, description). The question expands into an inline editor with a yellow border.
* **Red trash** — click to delete the question.
 ### Product Categories
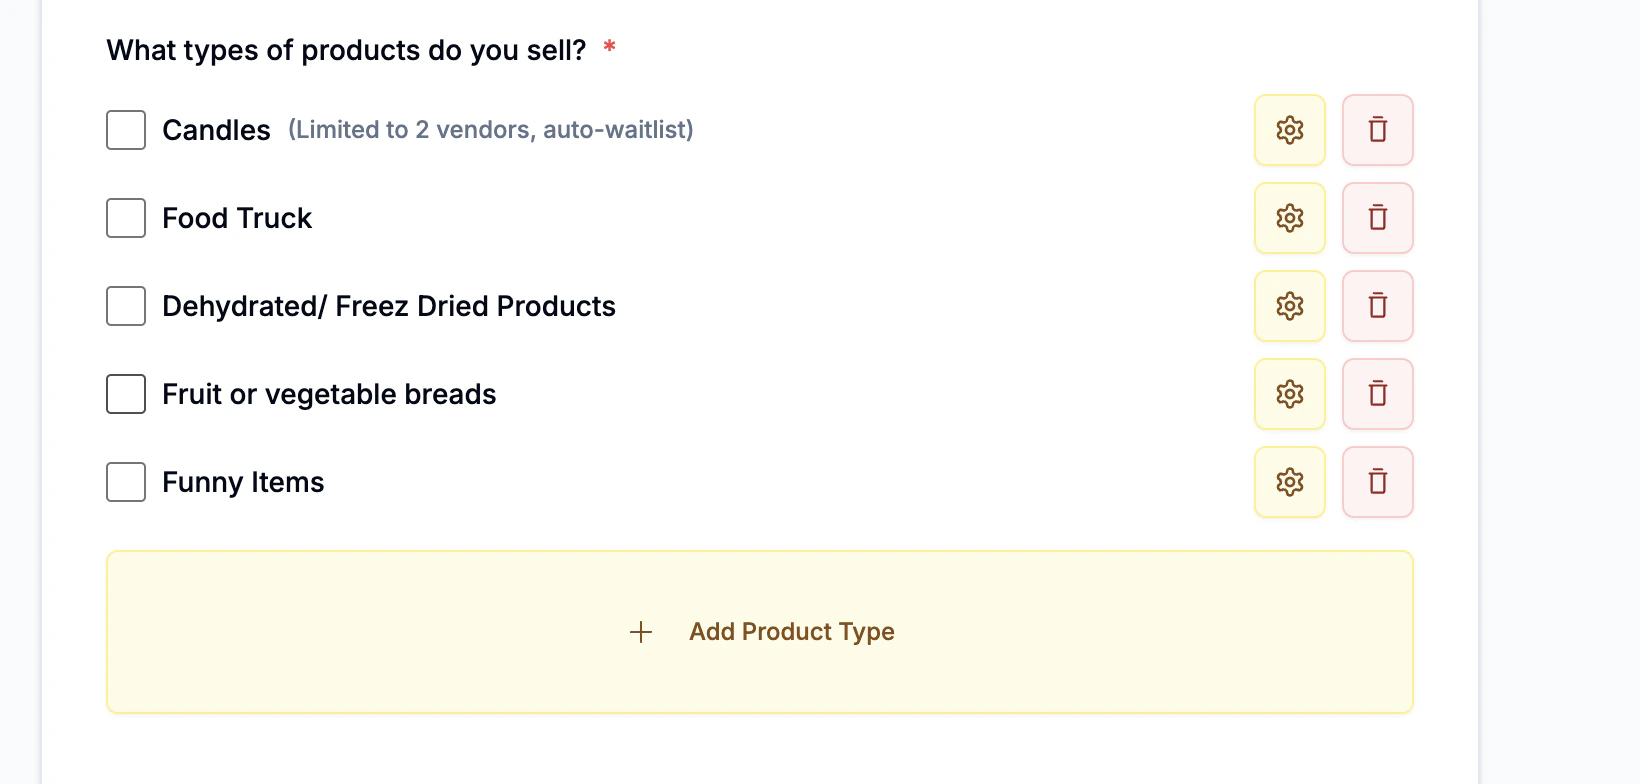
Look for the yellow **"Add Product Type"** button. Add the categories vendors can choose from when applying (e.g. "Food", "Handmade", "Vintage", "Art"). Each category has:
* **Yellow settings icon** — edit the category.
* **Red trash icon** — delete it.
Product categories help you organize and filter vendors. You can also set a maximum number of vendors per category and enable auto-waitlisting per category.
### Product Categories
Look for the yellow **"Add Product Type"** button. Add the categories vendors can choose from when applying (e.g. "Food", "Handmade", "Vintage", "Art"). Each category has:
* **Yellow settings icon** — edit the category.
* **Red trash icon** — delete it.
Product categories help you organize and filter vendors. You can also set a maximum number of vendors per category and enable auto-waitlisting per category.
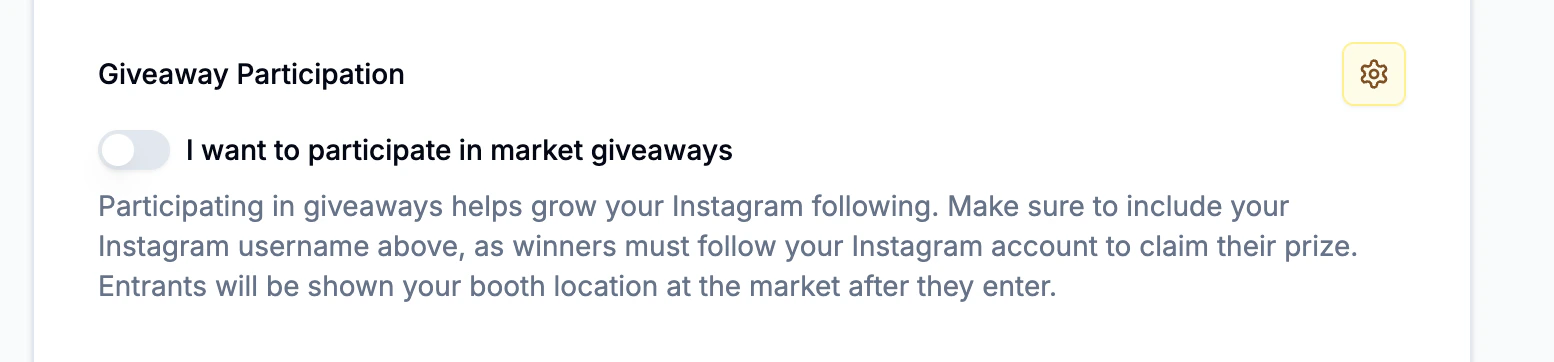
 ### Giveaway Section
If you want vendors to contribute prizes for giveaways, look for the **yellow settings icon** next to the giveaway section title. Click it to:
* Show or hide the giveaway section on the form.
* Customize the title and description.
When enabled, vendors can indicate whether they'd like to contribute a prize and what they'd offer.
### Giveaway Section
If you want vendors to contribute prizes for giveaways, look for the **yellow settings icon** next to the giveaway section title. Click it to:
* Show or hide the giveaway section on the form.
* Customize the title and description.
When enabled, vendors can indicate whether they'd like to contribute a prize and what they'd offer.
 ### Tax ID Section
Click the **yellow settings icon** on the Tax ID section to:
* Show or hide the tax ID field.
* Customize the title and description.
* Configure which tax ID types are accepted.
* Set whether it's required.
### Tax ID Section
Click the **yellow settings icon** on the Tax ID section to:
* Show or hide the tax ID field.
* Customize the title and description.
* Configure which tax ID types are accepted.
* Set whether it's required.
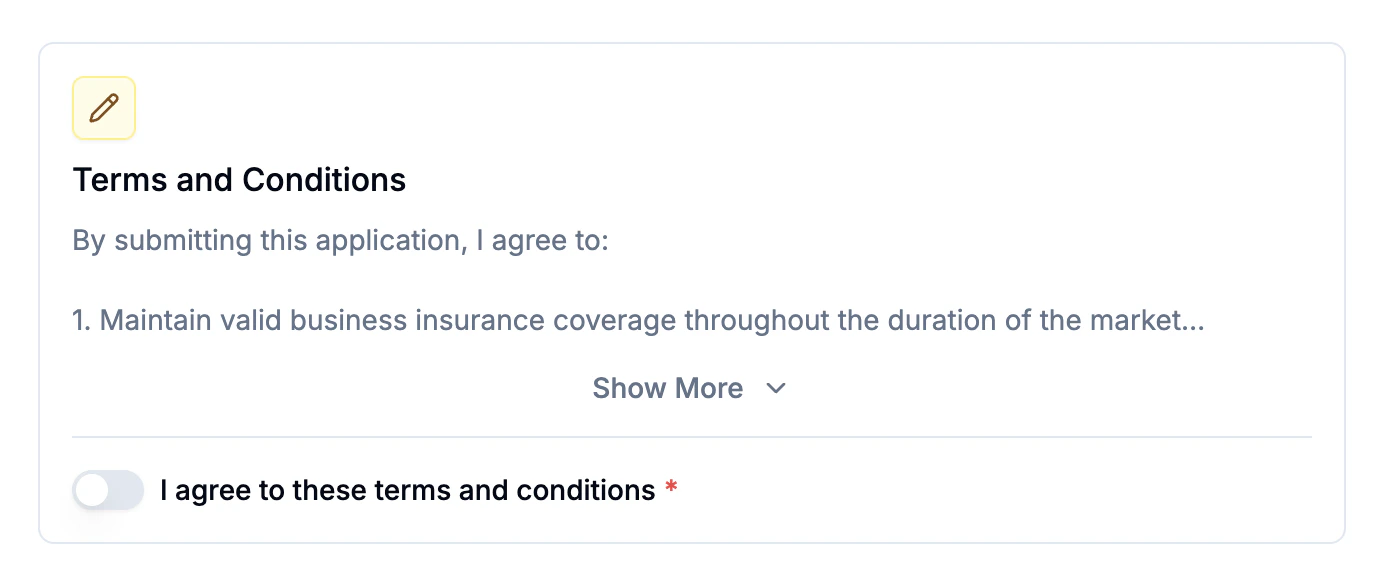
 ### Terms & Conditions
Click the **yellow settings or pencil icon** on the terms section to:
* Show or hide terms & conditions.
* Customize the title.
* Write your terms text.
When enabled, vendors must agree to your terms before submitting.
### Terms & Conditions
Click the **yellow settings or pencil icon** on the terms section to:
* Show or hide terms & conditions.
* Customize the title.
* Write your terms text.
When enabled, vendors must agree to your terms before submitting.
 ## Form Settings (Deadline & Waitlist)
Click the **Form Settings** button at the top of the editor to open a dialog where you configure:
### Application Deadline
Set a **deadline** after which the form no longer accepts new applications. After the deadline, vendors see a message that applications are closed (or are automatically placed on the waitlist — see below).
### Auto-Waitlist
Configure an **auto-waitlist threshold** — when the number of approved vendors reaches this number, all new applications are automatically set to "waitlist" status instead of "pending." You can also force all new applications to waitlist regardless of count.
## Import Form from Another Market
Click **Import Form** at the top of the editor to copy all custom questions, product categories, and settings from another market you manage. This saves time when setting up forms for recurring dates or similar events.
## Sharing Your Form
Click **Share** at the top of the editor (or click the URL bar). Your application link looks like:
```
https://seenmarkets.com/markets/[your-market-id]/apply
```
Share this link via:
* Email to potential vendors
* Social media posts
* Your website
* The mobile app's Share sheet
Anyone with the link can apply — no account required to start. Vendors create
an account during submission so they can track their application.
## What Vendors See
When a vendor opens the application link, they go through a multi-step form:
1. **Instructions** — your market info and instructions. They click "Start Application" to continue.
2. **Name and email** — basic contact info.
3. **Full form** — standard fields (business name, description, contact), your custom questions, product categories, giveaway contribution (if enabled), tax ID (if enabled), and terms & conditions (if enabled).
4. **Submit** — creates their vendor account (if new) and sends the application.
After submitting, the vendor is redirected to their vendor portal where they can track the application status.
## After Vendors Apply
Applications appear in your **Vendor management** table on the market page. From there you can:
* Review each submission (expand to see all responses).
* Set status: **Approved**, **Waitlisted**, **Denied**, or leave as **Pending**.
* Vendors automatically receive an email when you change their status.
For more on managing vendors after they apply, see [Vendor Management](/essentials/vendor-management).
## Frequently Asked Questions
Yes. Changes apply to future applications only — existing submissions are
not affected.
Yes. Use **Import Form** to copy custom questions and settings from any of
your other markets. When you duplicate/add another date, the form is copied
automatically.
After the deadline, the form shows a closed message. If you've configured
auto-waitlist or force-waitlist, late applications may be accepted but placed
on the waitlist.
No. The form editor is a live preview with yellow edit controls overlaid.
You see exactly what vendors see, plus the yellow-highlighted areas where
you can customize.
## Next Steps
Review applications and manage vendors
Assign booths to approved vendors
Collect booth fees from vendors
## Form Settings (Deadline & Waitlist)
Click the **Form Settings** button at the top of the editor to open a dialog where you configure:
### Application Deadline
Set a **deadline** after which the form no longer accepts new applications. After the deadline, vendors see a message that applications are closed (or are automatically placed on the waitlist — see below).
### Auto-Waitlist
Configure an **auto-waitlist threshold** — when the number of approved vendors reaches this number, all new applications are automatically set to "waitlist" status instead of "pending." You can also force all new applications to waitlist regardless of count.
## Import Form from Another Market
Click **Import Form** at the top of the editor to copy all custom questions, product categories, and settings from another market you manage. This saves time when setting up forms for recurring dates or similar events.
## Sharing Your Form
Click **Share** at the top of the editor (or click the URL bar). Your application link looks like:
```
https://seenmarkets.com/markets/[your-market-id]/apply
```
Share this link via:
* Email to potential vendors
* Social media posts
* Your website
* The mobile app's Share sheet
Anyone with the link can apply — no account required to start. Vendors create
an account during submission so they can track their application.
## What Vendors See
When a vendor opens the application link, they go through a multi-step form:
1. **Instructions** — your market info and instructions. They click "Start Application" to continue.
2. **Name and email** — basic contact info.
3. **Full form** — standard fields (business name, description, contact), your custom questions, product categories, giveaway contribution (if enabled), tax ID (if enabled), and terms & conditions (if enabled).
4. **Submit** — creates their vendor account (if new) and sends the application.
After submitting, the vendor is redirected to their vendor portal where they can track the application status.
## After Vendors Apply
Applications appear in your **Vendor management** table on the market page. From there you can:
* Review each submission (expand to see all responses).
* Set status: **Approved**, **Waitlisted**, **Denied**, or leave as **Pending**.
* Vendors automatically receive an email when you change their status.
For more on managing vendors after they apply, see [Vendor Management](/essentials/vendor-management).
## Frequently Asked Questions
Yes. Changes apply to future applications only — existing submissions are
not affected.
Yes. Use **Import Form** to copy custom questions and settings from any of
your other markets. When you duplicate/add another date, the form is copied
automatically.
After the deadline, the form shows a closed message. If you've configured
auto-waitlist or force-waitlist, late applications may be accepted but placed
on the waitlist.
No. The form editor is a live preview with yellow edit controls overlaid.
You see exactly what vendors see, plus the yellow-highlighted areas where
you can customize.
## Next Steps
Review applications and manage vendors
Assign booths to approved vendors
Collect booth fees from vendors