> ## Documentation Index
> Fetch the complete documentation index at: https://guides.seenmarkets.com/llms.txt
> Use this file to discover all available pages before exploring further.
# Payment Processing
> Set up and manage vendor payments through Stripe
## Overview
Seen Markets uses Stripe to process vendor payments. Hosts connect Stripe, then collect booth fees, request custom payments, or let vendors pay when they select a booth. Funds go directly to your connected Stripe account.
Seen Markets charges a **2% processing fee** on top of Stripe's standard
fees on Free and Pro plans. **Pro Plus** and **Pro Concierge** plans enjoy
**0% platform fees**. You can optionally pass the fee to vendors.
## Setting Up Payments
### Step 1: Connect Stripe
Go to [seenmarkets.com/settings/payments](https://seenmarkets.com/settings/payments) (or use the **Getting started checklist** in the mobile app).
1. **Create a new Stripe account** — complete the Stripe Connect onboarding with your business info and payout details.
2. **Or connect an existing account** — log in to your Stripe account and authorize the connection.
### Step 2: Configure Settings
Once connected:
* **Platform fee pass-through** — choose whether the 2% Seen Markets fee is absorbed by you or passed to vendors.
* **Brand your payment experience** — at [dashboard.stripe.com/settings/branding](https://dashboard.stripe.com/settings/branding), add your logo and brand colors.
* **Configure receipts** — at [dashboard.stripe.com/settings/emails](https://dashboard.stripe.com/settings/emails), customize receipt emails.
## Three Ways to Collect Payment
### 1. Request Payment (most common)
From the vendor management table on your market page:
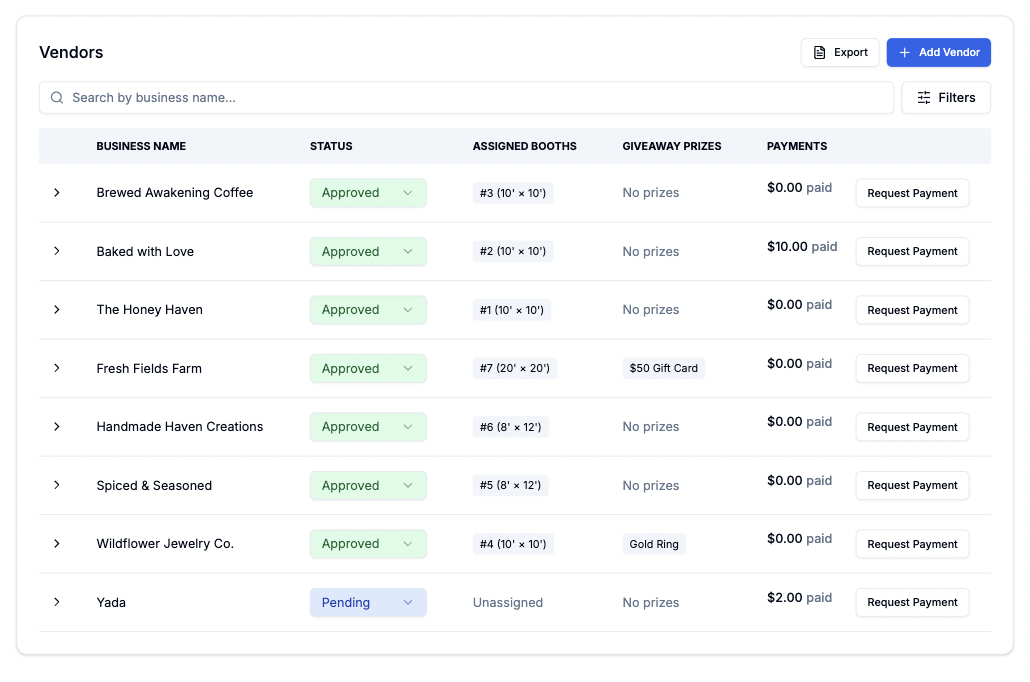 1. Expand a vendor row.
2. Click **Request Payment**.
3. Enter the amount and description (e.g. "Booth Fee — 10x10 Space").
4. Submit.
The vendor receives an email with a secure **Stripe checkout link**. They click it, pay, and the payment is recorded automatically.
### 2. Booth Selection Checkout
When you enable **vendor booth self-selection** and set prices on booths:
1. Approved vendors see the booth map and available booths with prices.
2. Vendor selects a booth → goes to **Stripe checkout**.
3. After payment, the booth is assigned automatically.
This is configured in the [Booth Map Designer](/essentials/booth-map) (booth prices) and **Booth Selection Settings** (enable self-selection).
### 3. Record a Manual Payment
If a vendor paid outside Stripe (cash, check, Venmo, etc.):
1. Expand the vendor row in the vendor management table.
2. Click **Record Payment** (manual).
3. Enter the amount and description.
4. Mark as paid.
This updates the vendor's payment status without going through Stripe. No fees apply.
## Managing Payments
Track all payments in the vendor management table:
* **Pending** — payment requested, waiting for vendor to pay.
* **Paid** — payment completed (Stripe or manual).
* **Failed** — Stripe payment attempt failed.
* **Refunded** — payment was refunded.
* **Cancelled** — host cancelled the payment request.
### Actions
* **Cancel** a pending payment request.
* **Resend** the payment link if a vendor lost the email.
* View **transaction details** and history per vendor.
## Where Vendors Pay
* **Email** — vendors receive a link to a Stripe checkout page.
* **Mobile app** — pending payments appear on the vendor's Schedule tab with a "Pay Now" button.
* **Vendor portal (web)** — pending payments are visible on the dashboard.
## Best Practices
* Complete all Stripe verification steps before your first market.
* Configure branding so checkout pages look professional.
* Decide upfront whether to pass the platform fee to vendors.
* Send payment requests promptly after approving vendors.
* Include clear descriptions so vendors know what they're paying for.
* Follow up on pending payments before the market date.
* Use booth self-selection with pricing for hands-off collection.
* Check payment status regularly in the vendor table.
* Record manual payments so your records are complete.
* Export vendor data for your own bookkeeping.
## Frequently Asked Questions
Funds are available in your Stripe account within 2–7 business days,
depending on your Stripe payout schedule.
Seen Markets charges 2% on top of Stripe's standard processing fees on
Free and Pro plans (0% on Pro Plus and Pro Concierge). You can pass the
platform fee to vendors in your payment settings.
All payments are processed through Stripe's PCI-compliant platform. Seen
Markets never handles sensitive payment information.
Use the manual payment option to record it. This keeps your vendor records
accurate without requiring Stripe checkout.
## Next Steps
Manage vendor payments from the vendor table
Set booth prices and enable self-selection
Learn about payment notification emails
1. Expand a vendor row.
2. Click **Request Payment**.
3. Enter the amount and description (e.g. "Booth Fee — 10x10 Space").
4. Submit.
The vendor receives an email with a secure **Stripe checkout link**. They click it, pay, and the payment is recorded automatically.
### 2. Booth Selection Checkout
When you enable **vendor booth self-selection** and set prices on booths:
1. Approved vendors see the booth map and available booths with prices.
2. Vendor selects a booth → goes to **Stripe checkout**.
3. After payment, the booth is assigned automatically.
This is configured in the [Booth Map Designer](/essentials/booth-map) (booth prices) and **Booth Selection Settings** (enable self-selection).
### 3. Record a Manual Payment
If a vendor paid outside Stripe (cash, check, Venmo, etc.):
1. Expand the vendor row in the vendor management table.
2. Click **Record Payment** (manual).
3. Enter the amount and description.
4. Mark as paid.
This updates the vendor's payment status without going through Stripe. No fees apply.
## Managing Payments
Track all payments in the vendor management table:
* **Pending** — payment requested, waiting for vendor to pay.
* **Paid** — payment completed (Stripe or manual).
* **Failed** — Stripe payment attempt failed.
* **Refunded** — payment was refunded.
* **Cancelled** — host cancelled the payment request.
### Actions
* **Cancel** a pending payment request.
* **Resend** the payment link if a vendor lost the email.
* View **transaction details** and history per vendor.
## Where Vendors Pay
* **Email** — vendors receive a link to a Stripe checkout page.
* **Mobile app** — pending payments appear on the vendor's Schedule tab with a "Pay Now" button.
* **Vendor portal (web)** — pending payments are visible on the dashboard.
## Best Practices
* Complete all Stripe verification steps before your first market.
* Configure branding so checkout pages look professional.
* Decide upfront whether to pass the platform fee to vendors.
* Send payment requests promptly after approving vendors.
* Include clear descriptions so vendors know what they're paying for.
* Follow up on pending payments before the market date.
* Use booth self-selection with pricing for hands-off collection.
* Check payment status regularly in the vendor table.
* Record manual payments so your records are complete.
* Export vendor data for your own bookkeeping.
## Frequently Asked Questions
Funds are available in your Stripe account within 2–7 business days,
depending on your Stripe payout schedule.
Seen Markets charges 2% on top of Stripe's standard processing fees on
Free and Pro plans (0% on Pro Plus and Pro Concierge). You can pass the
platform fee to vendors in your payment settings.
All payments are processed through Stripe's PCI-compliant platform. Seen
Markets never handles sensitive payment information.
Use the manual payment option to record it. This keeps your vendor records
accurate without requiring Stripe checkout.
## Next Steps
Manage vendor payments from the vendor table
Set booth prices and enable self-selection
Learn about payment notification emails